How to make a custom bin cage!
From Hamster Central WIKI
Since I came across these bin cages I decided never to go back to those ordinary or to extraordinary expensive store bought rodent cages. More often then not I find most of the typical pet store little critter animal animal cages to be to small. I cant help but look at the majority of them and think of how it must be to live in such a confined area. In the wild a hamster will roam much farther then the small area offered as floor space in any regular small animal cages.
I know that we offer our small furry friends an exercise wheel for that extra added physical fitness, But it is in my view that this just isn't good enough. Some gerbils don't like to use wheels. Within reason I feel the largest possible cage should be offered and thats what is great about making a bin cage!
They are starting to become popular amongst small animal lovers, and if you plan on breeding this is an affordable way to save on enclosures, not to mention that they are easily stackable and can save you allot of room while having the hamstery you always wanted!
First you will want to take a look at the needed supplies. Bin cages can be made with old wire rodents cages or birdcages provided that the bar spacing is a half inch apart for. However you don't need to have an old cage. Wire mesh can be purchased for a few dollars a foot from many hardware stores. Both my bins were made with inexpensive wire mesh.
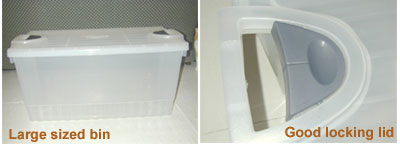
Next you will want to find a sturdy plastic storage bin. Preferably with heavy locking lids. Rubbermaid is a good choice, both strong and sturdy. It might be ideal to find a bin that is clear allowing some light through and also allowing you to see the hamster(s).
You will need the fallowing tools to cut holes in the front, sides and top of the bin.
- Marker or Tape: This will be used to mark the areas on the bin where you plan to cut out ventilation areas.
- Drill: In order to cut the holes you will first need to drill a good sized whole into the plastic first to allow your cutting tool to have a place to start. Be sure to drill a hole in every corner of you plan to cut a ventilation hole so that you can easily and smoothly cut the plastic in straight line.
- Scroll Saw: This is what you will use to cut the shapes out where you intend to mount the bars or mesh for ventilation. Do not attempt to cut around corners with the scroll saw, use the drilled holes as your starting point only cutting in straight lines. This helps avoid the plastic from cracking.
- Rough Sandpaper: This will be used for sanding any rough pieces of plastic off the cut out hole in your bin
There are a number of places you can choose to cut your ventilation areas. Your imagination really is the limit here. But for an example I decided to cut out an area in the lid of my bin and two places on the front and back. The reason you want ventilation areas mounted higher is because hamsters might like to dig. So keeping them up high prevents mounds of bedding being pushed out and onto the floor.
Before you start, mark your bin with a marker or tape where you plan on cutting for ventilation. Make sure that the hole you cut out is smaller then the amount of mesh or wire you plan on using. The wire or mesh will be mounted from the inside and there must be enough over lap to prevent your ham friend from gnawing on the plastic edges.


Here are the fallowing tools you will need to prepare the wire or mesh
- Hacksaw: This will be used for cutting the wire from and old cage if necessary.
- Wire Cutters: for the obvious reason, you will be able to use these for cutting thin pieces of wire.
- Metal File: This will be used for sanding down sharp wire edges. You dont want your hamster or yourself to be injured by sharp metal. It is important this is smoothed down.
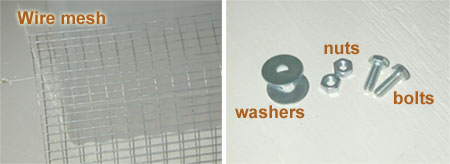
You will also need a number of washers, nuts and bolts that will be used to secure the wire or mesh onto the bin cages.You will need to pre drill holes around the outside of your cut out areas so that you can put the bolt through. To do this hold the wire or mesh to the inside of the bin centering it to the cut out areas. While you hold the wire in place mark where you plan on drilling your holes for the bolt to fit through.
Its safe to say that there should be a nut, bolt and two washers for every six inches of space to make sure that the wire or mesh is held on securely and hugs closely to the plastic of the bin. Having this in mind plot out where your bolts nut and washer will be placed and from there determine how many of these items you will need to purchase.
A washer should be larger then the bar spacing and there should be one used on both the inside and outside of the bin cage this will help evenly disperse the weight over the bar side and plastic side.
You will want to make sure that the wire or mesh is mounted from the inside and is larger in size then the cut out area of the plastic bin. This will prevent your hamster from being able to gnaw on the plastic edges.
Once you have sanded down any sharp edges on the wire with the metal file and sanded off any loose particles of plastic from the cut out holes you can now mount the wire or mesh.
Once this is done and you have mounted on the wire or mesh go back around and securely tighten the nuts to make sure the wire is snug and secure to the plastic bin.
Give the inside of the bin a wipe with a damp cloth or use a vacuum to remove any small bits of plastic. Now you have a basic and complete bin cage and are now ready to put a small furry friend inside.
Bin Notes:
Using old cages that housed a perviously ill hamster: If you are using part from a old hamster cage where the deceased animal died of an illness all materials used should be sterilized. One way of doing this is soaking or cleaning with a diluted solution of 9 parts water and 1 parts bleach. Make sure the cage parts are washed thoroughly with soap and water and allowed time to air dry for a week or two.
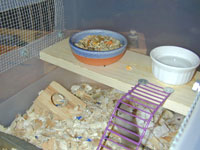
Adding Levels You can also add levels into the bin by drilling a piece of wood into the sides of the bin creating a sturdy platform. Make sure the platforms are far enough from the lid so the hamster cant chew any pieces of plastic hanging down and make sure its still high enough to put food bowls on without bedding getting piled into them. If the level is mounted high off the floor be sure to add guard rails to keep the hamster from falling off.
Mounting Water Bottles
Water bottles can be easily mounted on the inside of the bin by tightening a pipe clamp around the top of the water bottle and attaching bendable wire and hanging it around the side. Most bin lids will close with this piece coming out of it.
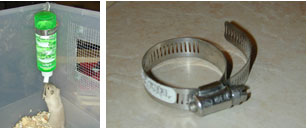
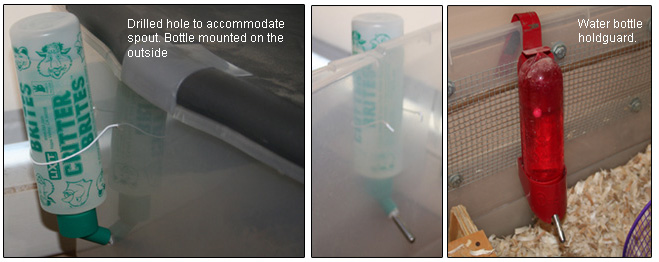
Note: some people will drill a hole right in the bin to place the spout through and keep it secure with duct tape or wire. This may be a good idea if you ham is a real chewer.
Disclaimer: This is just a little article about how I made my bin cage. Although I find these cages to be safe a escape proof I am not responsible for what happens with your pet or bin cage. I am simply offering a guide to make your own if you choose so.


