Mealworms are a great source of protein for rodents however they are not for everyone. Please consider maybe not reading this post if you are particularly squeemish...
Getting Started
Raising mealworms is a pretty simple affair. You will need the following to start a lasting mealworm colony:
Containers - get some cheap plastic storage containers. I recommend 2 large ones--one for the worms and one for the beetles. Mine are about 11"x16"x6". I also recommend a smaller one for housing the pupae until they transform into beetles.
Substrate - oat bran, wheat bran, and corn meal are the most commonly used substrates for mealworms.
Source of water - mealworms get their water from their food, so have carrots, apples, or potatoes on hand to place in the substrate. I've found carrots to work the best because they don't dry out as quickly as apple or potato slices, but basically any relatively moist food will work. Just know that you'll have to replace it every few days.
Mealworms - there are a lot of places to get your initial bunch of mealworms. You don't need many to start. I think I started my culture with a tub of about 100. You can purchase mealworms from a pet store, a bait store, or from several online distributors.
Got all your supplies? Good. Now, getting your colony started is easy. 1) Fill one of your large tubs with about 2-3 inches of substrate. As mentioned above, I use wheat bran for the main substrate, but I also add some rolled oats and powdered milk for extra nutrition. 2) Add your mealworms. 3) Add the water source. If your initial colony is small, you'll only need a few slices of potato or whatever you're using. As your colony grows, you'll have to adjust the amount you put in. That's it! You've got the beginnings of a mealworm farm. Now just keep your colony in a warm (not hot!), dry place and check on them daily to make sure they have fresh clean vegetable bits and that none of the substrate has become moist and/or moldy.
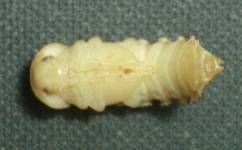
After a few months, your mealworms will get bigger and eventually they will start to pupate.
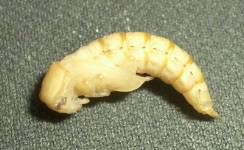
You can leave the pupae in with the mealworms, but the mealworms will frequently eat them. This then reduces the number of beetles your colony will produce, which in turn reduces the number of mealworms you'll produce. For maximum mealworm production, I begin checking the mealworm substrate daily and remove the pupae I find to a separate, smaller container. This container does not need any substrate as long as you plan to remove the beetles to a different container as soon as they emerge (again, the beetles will also munch on the pupae, so it is best not to keep the pupae and beetles in the same container). I do put a few paper towels in with the pupae. One lines the bottom of the container, the other sits on top of the pupae. I do this because the beetles frequently emerge on their backs, and the top paper towel gives them something to cling to.
When the beetles start emerging, it's time to prepare your second large container. Set this one up just like the first, perhaps with a little less substrate. The beetles don't burrow as much as their larval form, but baby mealworms will need substrate to feed on and hide in. I also throw some paper towels on top of the substrate to give the beetles a place to hide. As with the mealworms, the beetles need fresh fruit and veggies as a source of water.
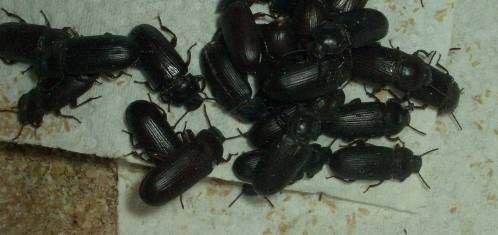
After a month or two, you may start to notice some very, very tiny worms crawling in the substrate. I usually wait until there seems to be a pretty considerable amount of movement before I take the substrate from the beetle container and add it to the mealworm container. Then I put new substrate in with the beetles and check on it every month or so to see if there is a considerable amount of tiny mealworms again. But once the first batch of mealworms hatches, you can begin harvesting worms for your pets. As long as you leave some mealworms to pupate and produce new beetles, your colony should be fairly stable. And the mealworms seem to grow faster than the beetles die off, so unless you massively over-harvest the mealworms, you should have no problems with sustainability.
Basic Maintenance and Things to Remember
Once you have a mature colony developing, you probably want to check on your worms and beetles at least every other day. I ritually comb through the mealworm tub and remove some of the largest mealworms (ie, the worms intended for consumption) to small tubs that I then store in the refrigerator. I also check for pupae, and remove any dead worms I find. I remove any vegetable bits that have dried out or become moldy and replace them with fresh vegetables. Finally, I try to stir the substrate around regularly. When the substrate gets really sandy, you need to remove as much of it as possible and put new meal in. You don't want your mealworms to starve! Also, check on your pupae container and remove any beetles to the beetle tub right away, especially if you don't keep food in your pupae container. Finally, check the vegetables and substrate in the beetle tub in the same way that you do for the mealworm tub. Also, check the substrate often for signs of movement. Young mealworms are really, really tiny, and you can usually detect their presence by movement, long before you can easily make out any worms.
That's it. It might sound like a lot of trouble initially, but once you get things going, maintaining mealworms is pretty easy, and you get a lot of mealworms relatively quickly. Sure, you could just buy them at the store if you don't need very many very often. But mealworm farming only takes about £10 of initial investment and after that the mealworms do a pretty good job of raising themselves. Plus, you don't find yourself running to the store every week to fill your pets' hungry little mouths. Besides, while mealworms are cheap if you only need to purchase them occasionally, raising them is cheaper if you need a new tub every week or two (and you generally will with birds and reptiles/amphibians). Also, some people like to make sure the worms they feed to their pets are as nutritionally beneficial as possible. If you're the one feeding the worms, then you have some control over how nutrient-rich they are. Also, some folks like to incorporate mealworms into their own diet, so once again you want to know that your mealworms weren't fed anything nasty. In short, there's a lot of reasons to raise your own mealworms. It's certainly not for everyone, but it can save some folks time and money.
More information on raising and eating mealworms can be found at some of these sites:
http://www.hollowtop.com/finl_html/mealworms.htm
http://www.uky.edu/Agriculture/Entom...misc/ef002.htm
http://www.tc.umn.edu/~devo0028/cmeal.htm
Yummy yummy I hear you all scream.....................


 Linear Mode


