Register FAQ Calendar Today's Posts Search
Navigation
Front Page
Forum
Gallery
Wiki

Ads by Google


Go Back   Hamster Central > Hamster Central Forum Topics > DIY (Do it yourself) Hamster Projects!

Notices

Reply
 
Thread Tools Display Modes
Old 10-20-2014, 07:03 AM   #1
morganel88
Newborn Pup
 
morganel88's Avatar
 
Join Date: Oct 2014
Location: Paris, France
Posts: 39
Send a message via Skype™ to morganel88
Default My approach to a bin cage.....

So…. After the loss of my Negrito, I decided that I wanted a fresh start and wanted to try out having a new species of hamster along with DIYing my own cage as here in France (well Paris) the cages are not very big. From there I went to Hamster Hideout to learn everything about bin cages and robo hamsters as that will be my next choice, so I thought that I would photograph all of my progress of the cage, from getting the materials all the way to the completed cage and maybe even the choosing of our new robos.

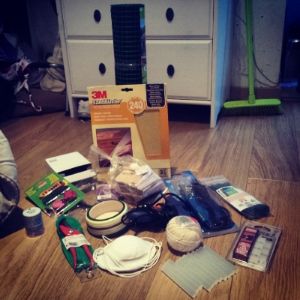
After plenty of debate with myself, getting opinions on Hamster Hideout and from some of the people that I follow and follow me on Instagram, I decided that I would go for the IKEA Salma box as the basis of the bin cage and from there I bought the rest of the materials that I needed to make and cover the holes that I planned to make in the bin along with all the stuff needed to make as many of the toys that I could by hand. Here in the pictures below are all the materials and the box:


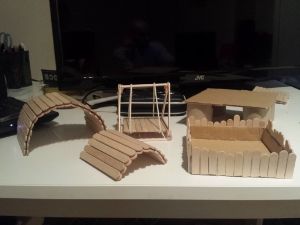
Before I get on to all the photos of the progress of the bin, I thought that I would take a moment to show the things that I have made along with the information about where I got instructions to make them. Overall I have made 2 bridges, a swing, a mini second level for them to access the water bottle and a sand bath for them. The second level and the sand bath I made myself but the bridges and the swing I followed instructions on YouTube:

The Bridges: https://www.youtube.com/watch?v=_3lqRdpSRXw
The Swing: https://www.youtube.com/watch?v=fj3qF5HwUjg

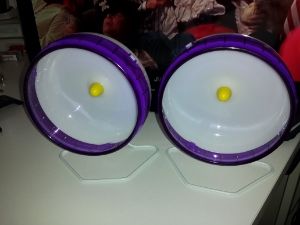
I also have lots of toilet and kitchen rolls to put in their cage too along with their wheels, one each and both purple. The only thing that I had left if to make or buy their houses…. I did attempt to make one but it went badly so I bought them instead…. Here is a picture of what I have made (I am proud of these I have to admit as I am usually rubbish at DIY):


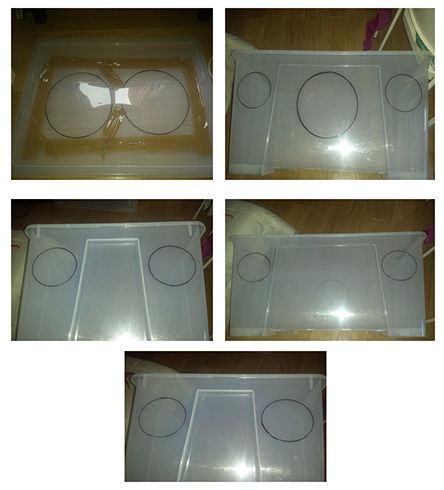
Now to the box, I loved the idea of being different as it is my first ever cage and I am rubbish at straight lines I decided that I would go for circles…… I ended up doing 11!!!!! I wanted to make sure that they have enough ventilation going throughout the cage but not affecting the space that they have inside or preventing me giving them enough bedding to run around and dig into. In the pictures below you will see the progress that I made from measuring them out to cutting the holes themselves….


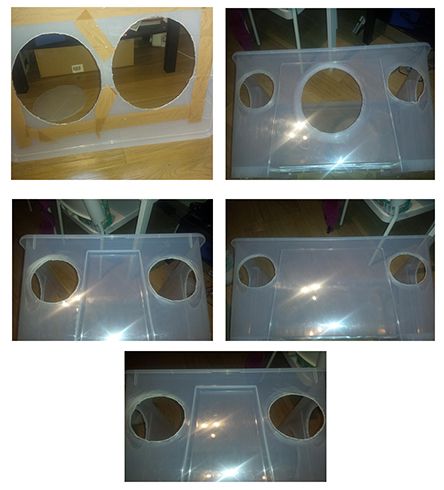
After about over 100 cables ties and shredded hands from pulling them tight to ensure no baby robo could escape this is what the final product looked like:


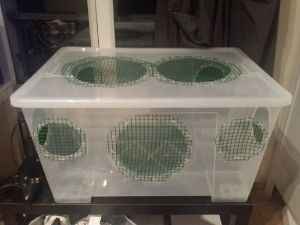
You will see that the cable ties are a different colour to the mesh. I wanted them to blend into the plastic box to avoid them being chewed and for the moment that has worked!

During this process I went back to the UK for a wedding and definitely used it as an excuse to buy lots of things for the new robos that I was going to get upon my return, things that are not easily found in France and things that are much cheaper in the UK so this is a pic of the final things for the cage:


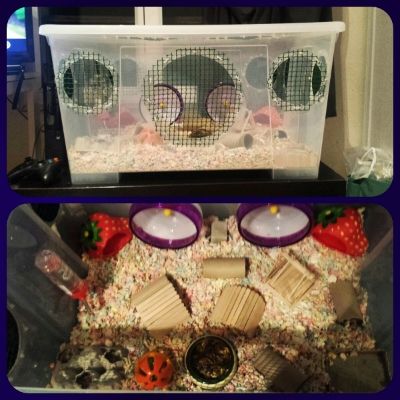
The night before I got my girls (I have had them almost 6 weeks now) I set up the cage so that it would be one less thing to do when I got them... Remembering from last time the pain of having to set up a cage while having a scared little hamster in a box next to you.... This was the original set up (I have cleaned the cage since then and moved everything all about):


So that is my adventure in making my own bin cage for my robos and they love it! If you want to know anything about how I made it then feel free to ask
morganel88 is offline   Reply With Quote
Old 10-20-2014, 07:10 AM   #2
dave123791
Hamster Addict
 
dave123791's Avatar
 
Join Date: May 2014
Location: Highlands, Scotland
Posts: 910
Default Re: My approach to a bin cage.....

Wow, that looks really nice. I love tutorials that have lots of details and pictures in them- this is perfect. Just out of interest: what did you use to cut out the holes? And the mesh?
__________________
Always do your best.. What you plant now, you will harvest later.

*Expectancy is the atmosphere for miracles.* ~Edwin Louis Cole
dave123791 is offline   Reply With Quote
Old 10-20-2014, 07:16 AM   #3
morganel88
Newborn Pup
 
morganel88's Avatar
 
Join Date: Oct 2014
Location: Paris, France
Posts: 39
Send a message via Skype™ to morganel88
Default Re: My approach to a bin cage.....

Thanks dave123791, I enjoy them too as I am a visual yet practical person

To cut the mesh I used scissors, it isn't a strong one but they can't bite through it and to cut the holes in the box to avoid cracks I used a soldering iron..... For this I would definitely recommend doing it outside or with windows open and at least 2 masks on your face as the smell is unreal! But as it avoids cracks it is worth it!
morganel88 is offline   Reply With Quote
Old 10-20-2014, 07:26 AM   #4
dave123791
Hamster Addict
 
dave123791's Avatar
 
Join Date: May 2014
Location: Highlands, Scotland
Posts: 910
Default Re: My approach to a bin cage.....

Quote:
Originally Posted by morganel88 View Post
Thanks dave123791, I enjoy them too as I am a visual yet practical person

To cut the mesh I used scissors, it isn't a strong one but they can't bite through it and to cut the holes in the box to avoid cracks I used a soldering iron..... For this I would definitely recommend doing it outside or with windows open and at least 2 masks on your face as the smell is unreal! But as it avoids cracks it is worth it!
Have you thought about using an angle grinder??

I used it for both- cutting the mesh and the box. (i have 2 bin cages). It would be a bit difficult for cutting out circles though.
__________________
Always do your best.. What you plant now, you will harvest later.

*Expectancy is the atmosphere for miracles.* ~Edwin Louis Cole
dave123791 is offline   Reply With Quote
Old 10-20-2014, 07:30 AM   #5
cypher
Dwarf whisperer
 
cypher's Avatar
 
Join Date: May 2014
Location: Wales UK
Posts: 24,789
Default Re: My approach to a bin cage.....

That looks really good, great job & really clear showing how you did it too.
I bet your hams love it!
cypher is offline   Reply With Quote
Old 10-20-2014, 07:48 AM   #6
becky1412
Senior Hamster
 
becky1412's Avatar
 
Join Date: Aug 2014
Location: Northern Ireland
Posts: 427
Default Re: My approach to a bin cage.....

Wow! Love it! I guess this sounds really stupid but I love the circles instead of the rectangles good job! Love the little homemade toys too
becky1412 is offline   Reply With Quote
Old 10-20-2014, 07:55 AM   #7
morganel88
Newborn Pup
 
morganel88's Avatar
 
Join Date: Oct 2014
Location: Paris, France
Posts: 39
Send a message via Skype™ to morganel88
Default Re: My approach to a bin cage.....

Quote:
Originally Posted by dave123791 View Post
Have you thought about using an angle grinder??

I used it for both- cutting the mesh and the box. (i have 2 bin cages). It would be a bit difficult for cutting out circles though.
I guess I would have gone down that route if I went with squares (my original idea) and if I ever make another bin cage I might go down that route.... I was more scared of breaking the box and despite the smell melting the plastic did make some very good shapes. For me cutting the "circles" out of the mesh was the more complicated bit.... some of them are very just but as they are out of the way of the hamsters I am not worried there
morganel88 is offline   Reply With Quote
Old 10-20-2014, 07:59 AM   #8
BrainGirl
Hamsters on the Brain
 
Join Date: Apr 2010
Location: Vancouver Island, Canada
Posts: 6,458
Default Re: My approach to a bin cage.....

Wow, great design! I agree that melting the plastic is an easier way to go when you want nice, smooth curves. When I installed a stereo system in my first car I used a wood burning tool from an art kit I was given to make holes for the 6 x 9 oval speakers in the back. Worked great, but the smell was overwhelming and the wood burning tool didn't survive A soldering iron would be much more durable for the task
BrainGirl is offline   Reply With Quote
Old 10-20-2014, 08:30 AM   #9
morganel88
Newborn Pup
 
morganel88's Avatar
 
Join Date: Oct 2014
Location: Paris, France
Posts: 39
Send a message via Skype™ to morganel88
Default Re: My approach to a bin cage.....

Good old wood burning tools.... that brings back memories and I can imagine it not surviving after that and yes a soldering iron survives much better.... it is like nothing happened to it!

Thanks people for the compliments, I do feel like all of my hard work did pay off in the end and I enjoyed making it too..... now to convince the SO for a Syrian and then I get to customise the two cages I have left over!
morganel88 is offline   Reply With Quote
Old 10-20-2014, 09:50 AM   #10
Skeever
Hamster Therapist
 
Skeever's Avatar
 
Join Date: May 2014
Location: Beirut, Lebanon
Posts: 2,550
Default Re: My approach to a bin cage.....

Yay for NO STRAIGHT LINES!!!! Great tutorial!

Now, have you made another one if you have a pair? In case the hams fall out, a second cage on hand is a must.
Skeever is offline   Reply With Quote
Reply


Posting Rules
You may not post new threads
You may not post replies
You may not post attachments
You may not edit your posts

BB code is On
Smilies are On
[IMG] code is On
HTML code is Off

Forum Jump

Powered by vBulletin®
Copyright ©2000 - 2024, Jelsoft Enterprises Ltd.
Search Engine Optimisation provided by DragonByte SEO v2.0.43 (Pro) - vBulletin Mods & Addons Copyright © 2024 DragonByte Technologies Ltd.
Copyright © 2003-2022, Hobby Solutions
All times are GMT -7. The time now is 02:01 AM.